Setup KT360
1. Insert Posts:

- Place your KT360 base on a flat secure surface and ensure the bolts in the post supports are loosened
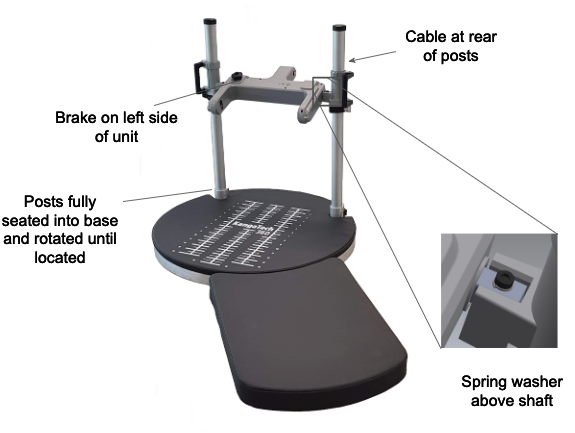
- The posts are sided, with the side indicated towards the bottom of the post. When the post is on the correct side, the cable and pulley will be at the rear and the handle on the outside
- Ensure the carrier handles on each post are locked before lifting the posts
- When inserting the posts, ensure they are fully seated into the post supports. You may need to raise the sensor housing carriers to ensure the post can move down into the support. When the post is fully seated and correctly aligned, it will locate in a notch in the bottom of the support which will prevent rotation
- Once both posts are in, lightly tighten the bolt in each post support using the supplied allen key
2. Insert Sensor Unit:
- Move both carriers to the bottom of the posts and align the shaft slots inwards before locking the handles
- Remove bolts and spring washers from the carriers and set aside
- Insert sensor unit into the shaft slots, with the black brake knob on the left side. If the sensor unit is correctly orientated, the label should be readable from the front.
- Once the unit is in place, release the handles and realign the shaft slots with the shaft
- Place the spring washer on top of the the shaft hole and then insert the bolt and tighten. Do not overtighten or the up-down movement of the carriers may be impacted.
3. Testing Operation:
- Release the handles and slide the carriers up and down the posts and ensure motion is smooth.
- Check that handles can be locked easily and unit is fixed in place once locked
- Release the rotational brake by turning black knob counter-clockwise. Ensure that the sensor unit rotates smoothly and freely.
- Tighten the rotational brake and ensure the sensor unit is fixed in place
- Finally, tighten the bolts in the post supports
Last updated on 2nd Apr 2023